
Review and convert a lead
Track interested families from inquiry to enrollment, email them and see their replies on the lead's timeline, then convert them to a family in one click.
A lead is a prospective family — someone who filled in your website inquiry form, called, or walked in asking about openings. NestliCare's lead tracker gives you a lightweight CRM that ends in a one-click "Convert to family" when they sign up.
Where leads come from
- Inquiry form on your public page — parents who find you on nestlicare.com/search submit directly
- Walk-ins — add them manually from Admissions & CRM → Add lead
- Phone or email follow-up — same, add manually. Once the lead exists, emails you send from its page are logged for you (see below)
- Enrollment packet submissions — an enrollment packet submitted publicly auto-creates a lead
Add a lead manually
- Go to Admissions & CRM.
- Click Add lead.
- Fill what you know.
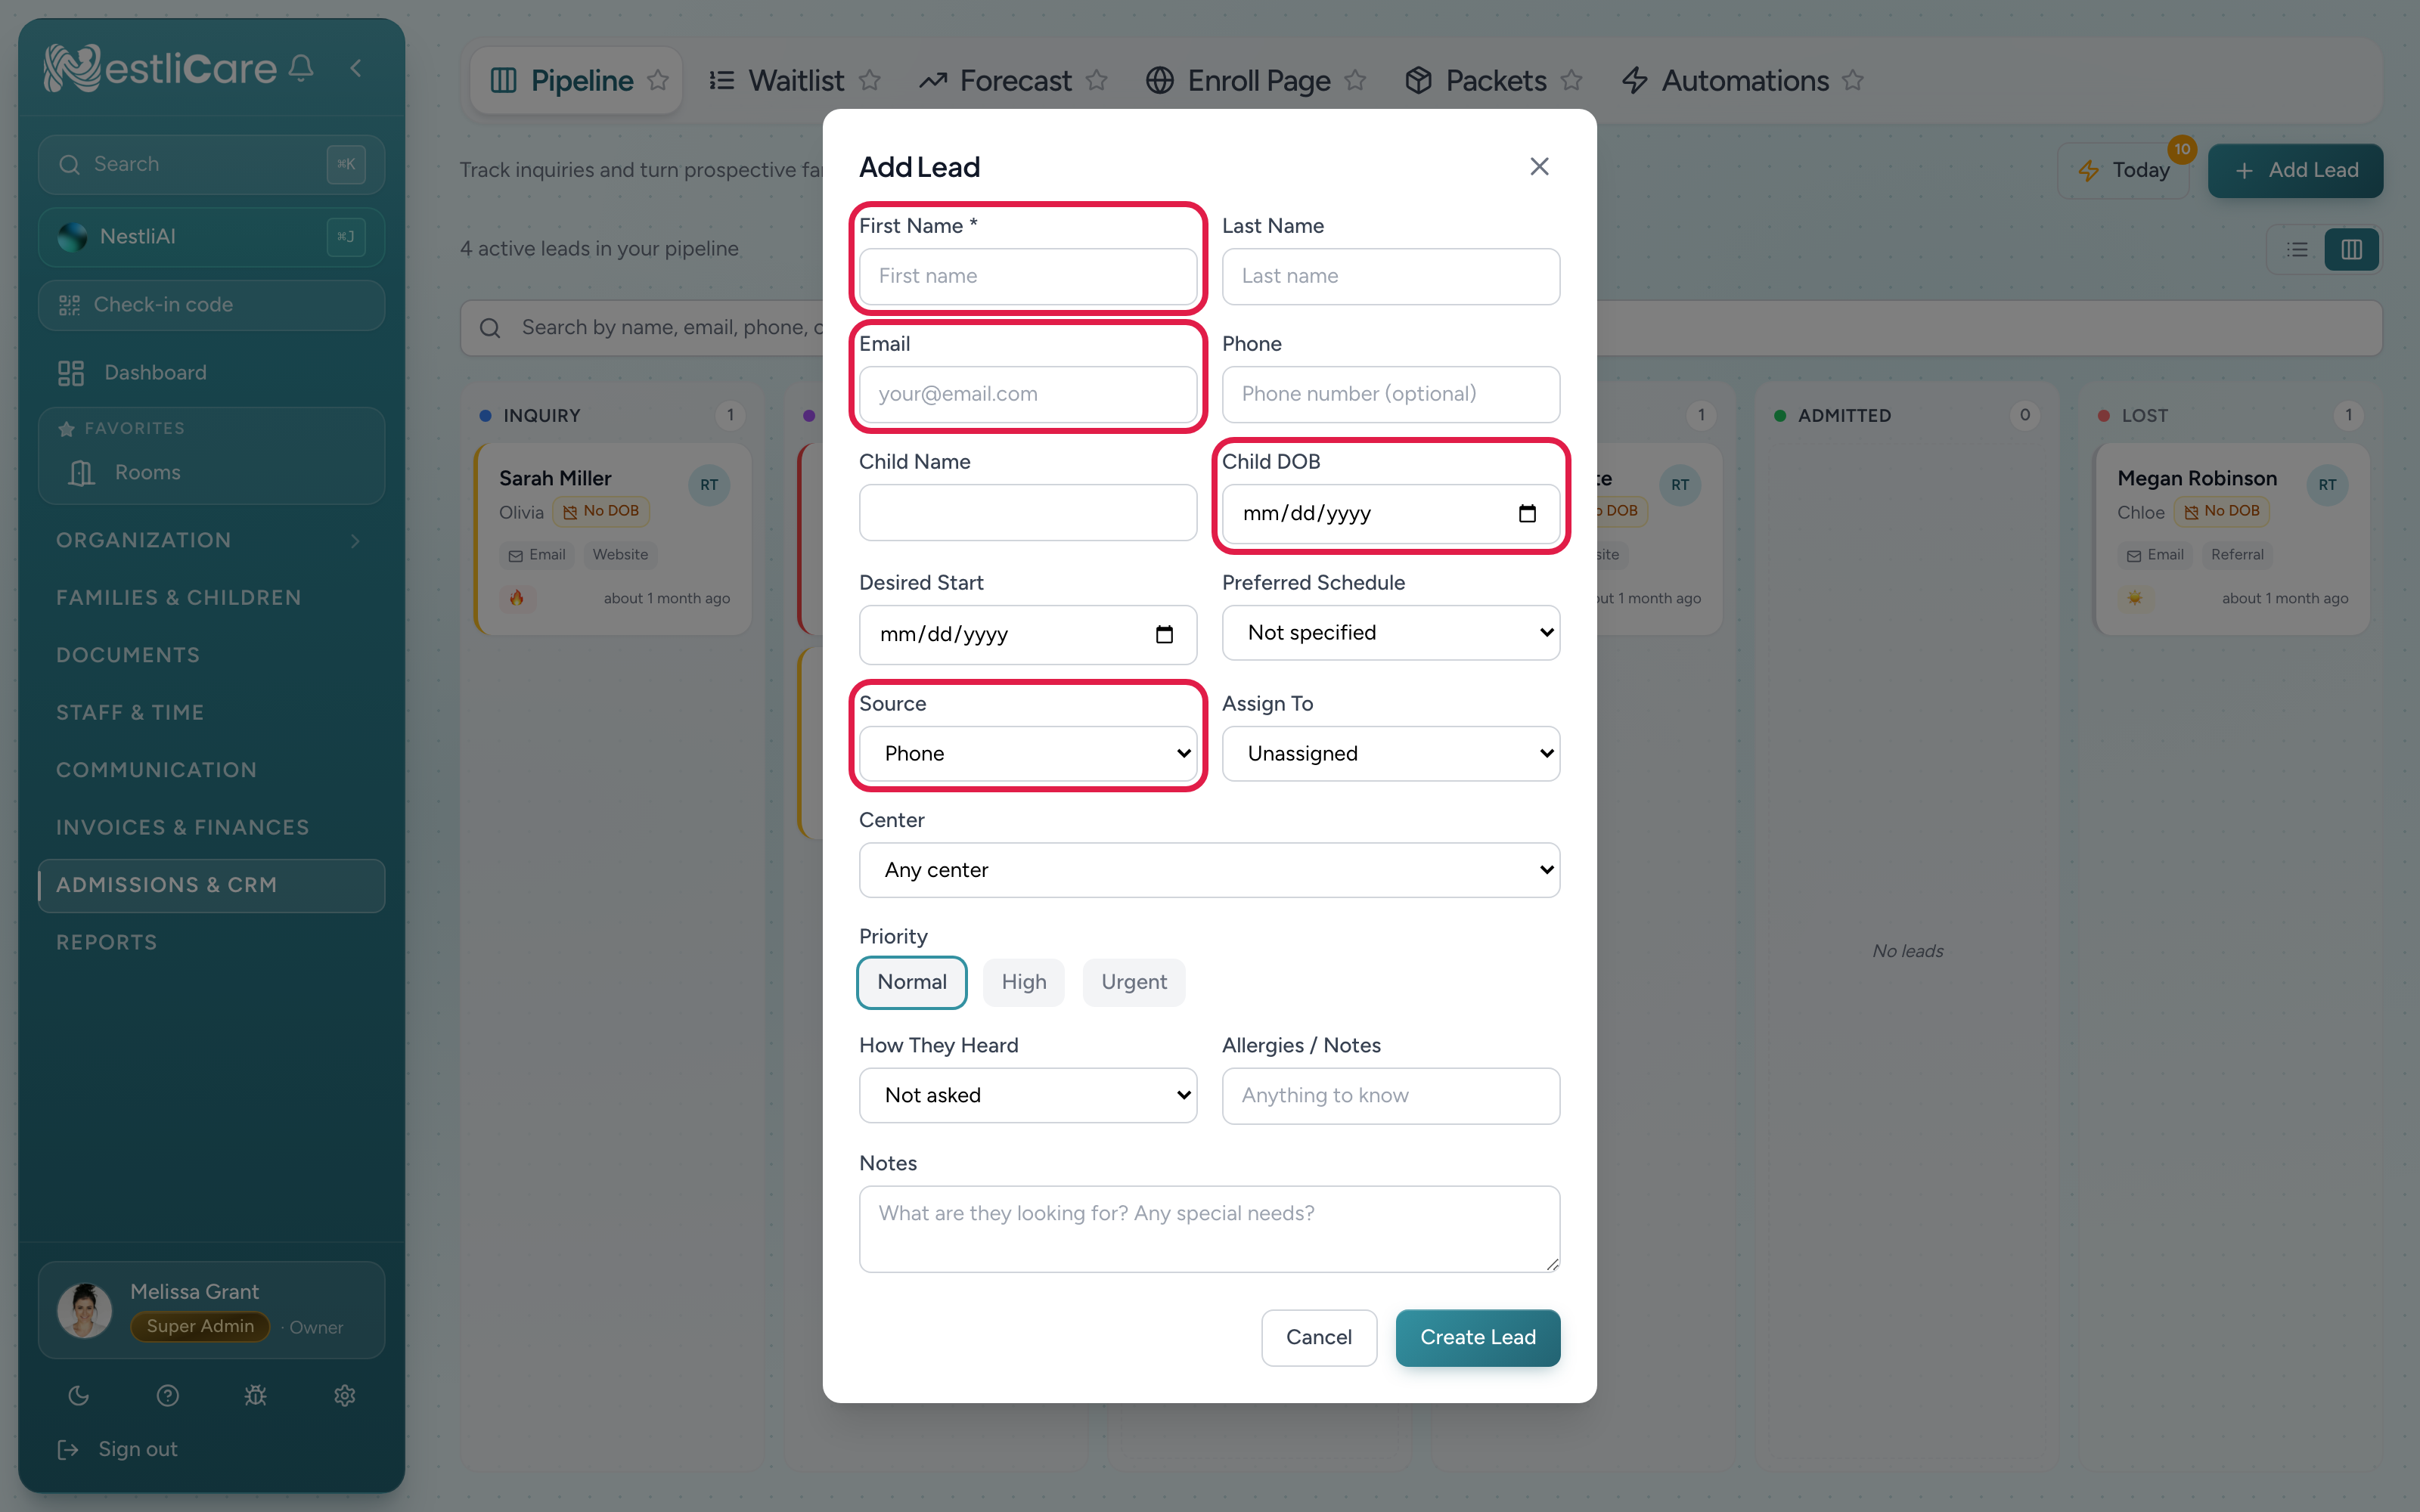
- 1Parent name — required. Everything else is optional, you can fill in over time
- 2Contact — email and phone. At least one so you can follow up
- 3Child's date of birth — we use this to suggest the right room
- 4Source — website, referral, walk-in. Free text; picks up your previous sources as suggestions
Move a lead through the pipeline
Leads have a status that reflects where they are:
- Pending — just came in, no contact yet
- Interested — you've made contact, they want to keep talking
- Touring — tour scheduled or completed
- Qualified — serious, ready to enroll
- Declined — lost to a competitor, picked another option, or never responded
- Enrolled — signed up (set automatically when you click Convert)
Change status from the lead detail page (Admissions & CRM → [lead name] → Status). Every status change is logged.
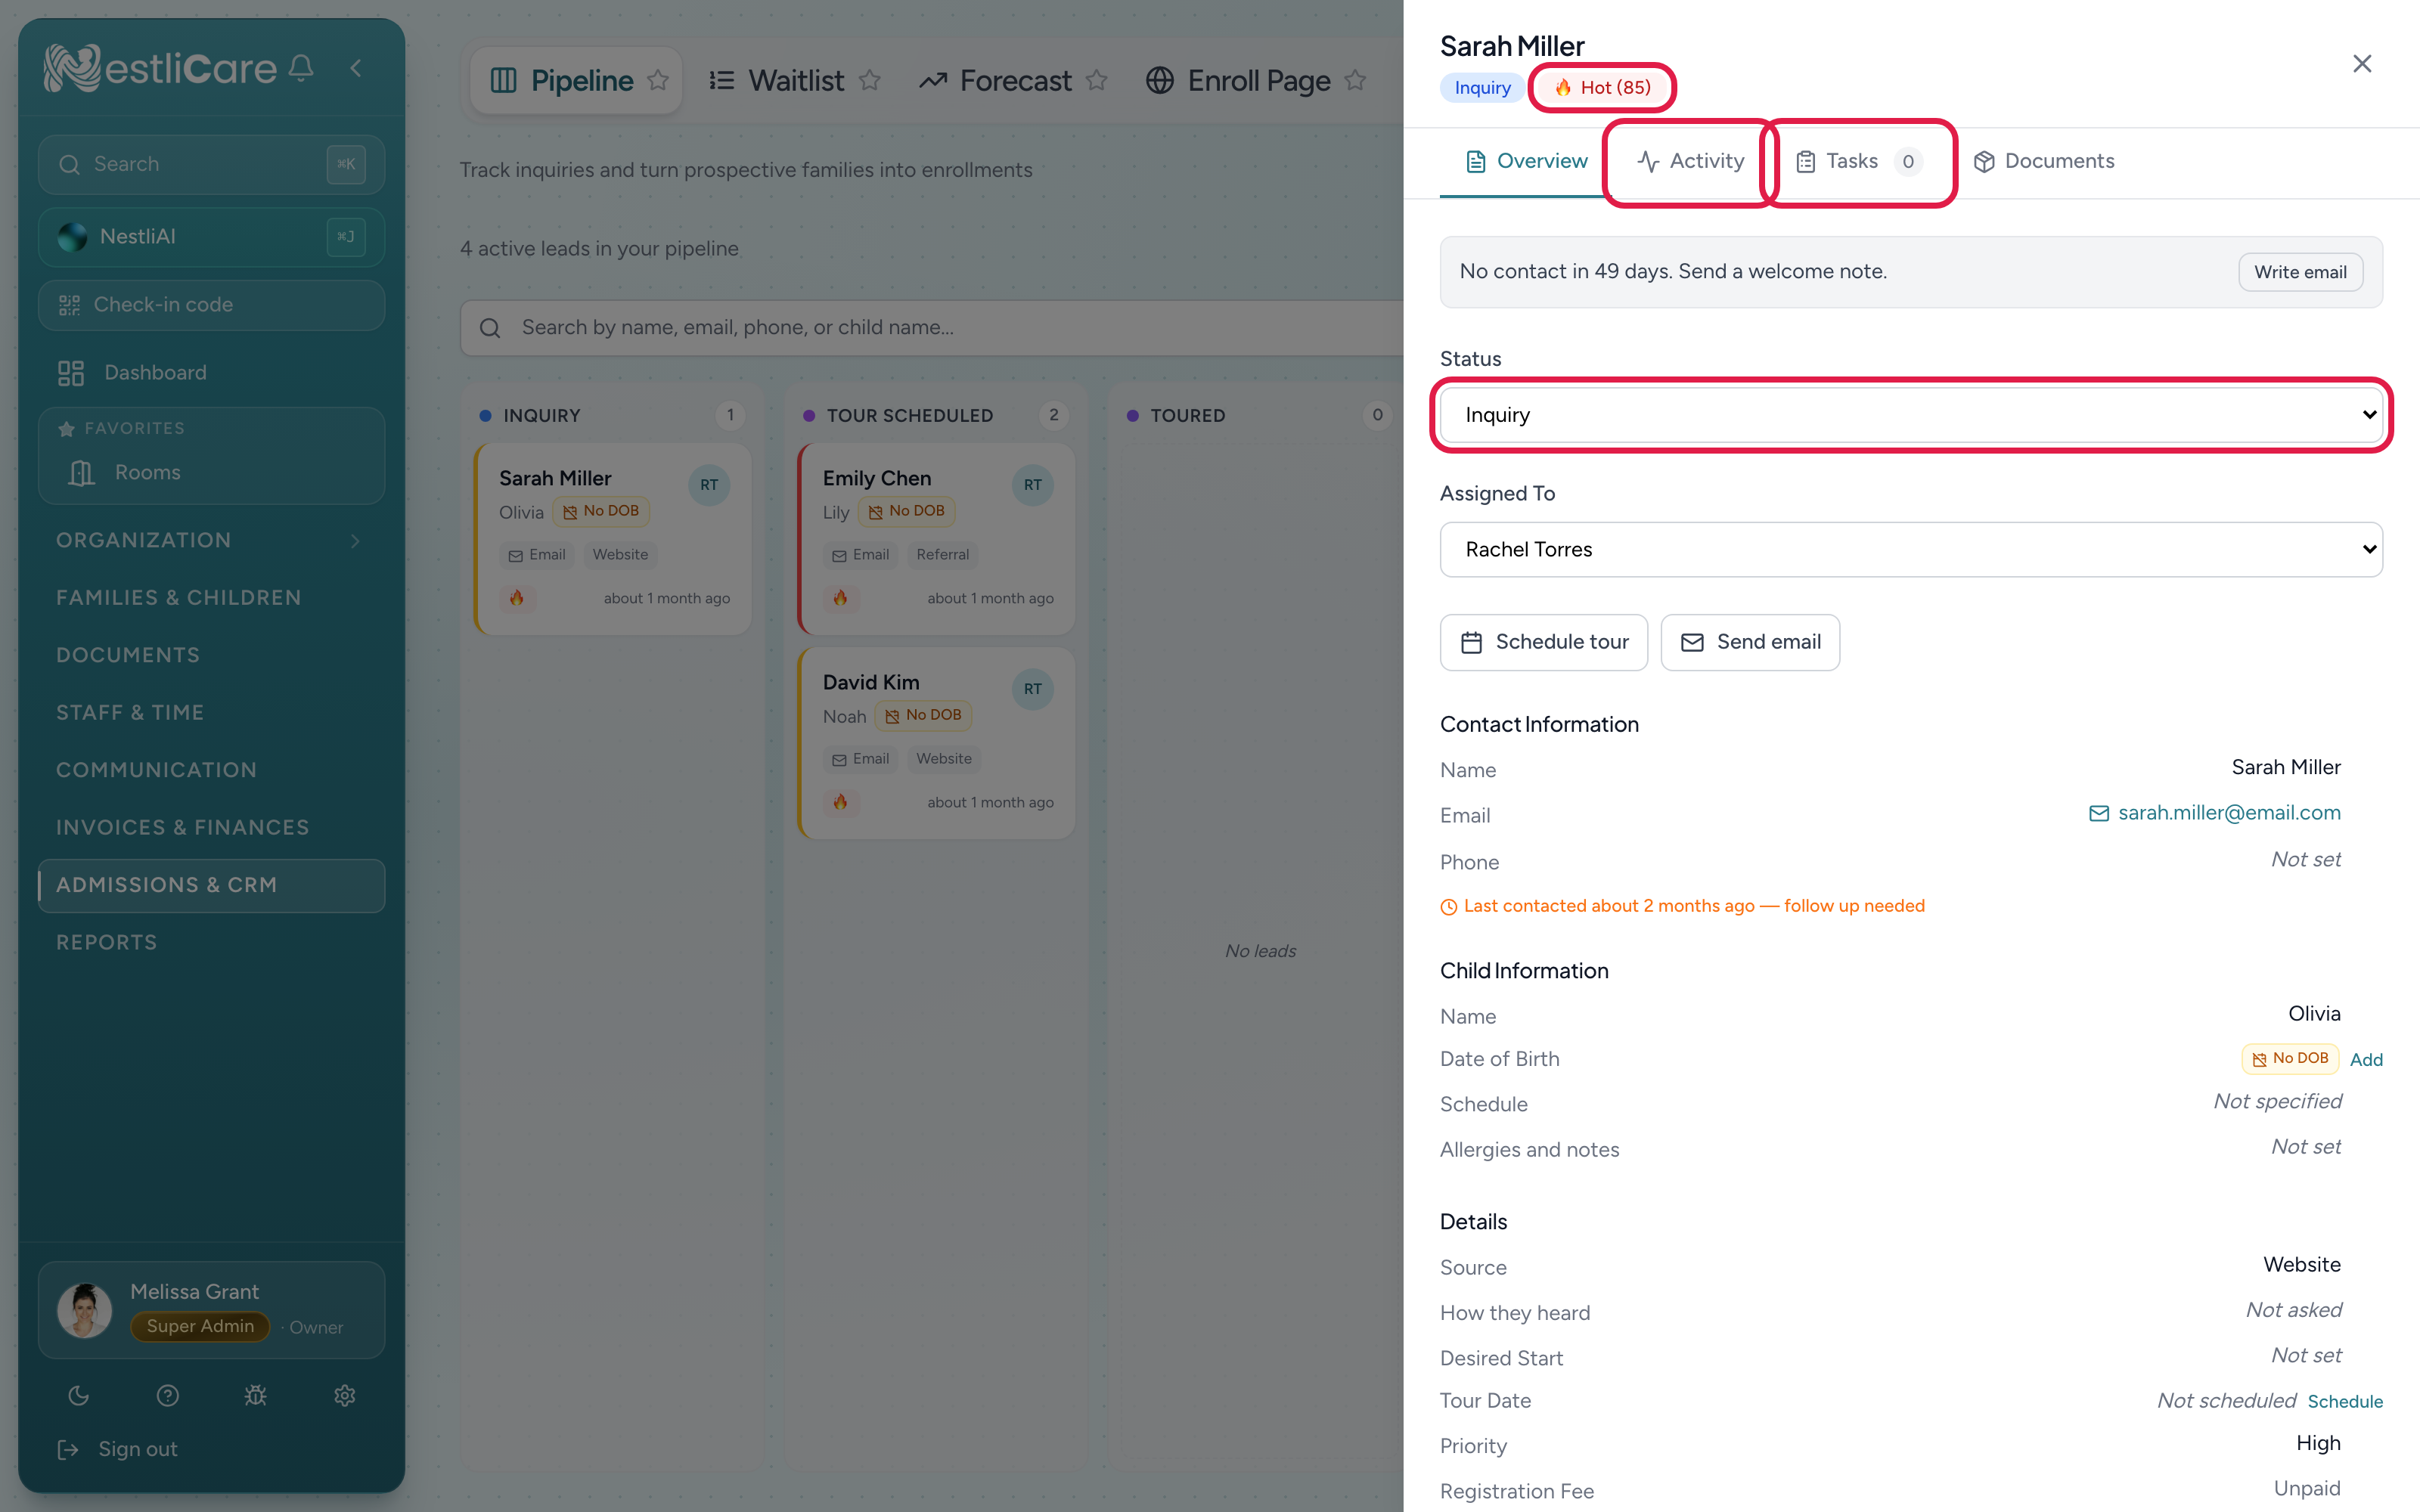
- 1Status dropdown — flip as you move the lead through the pipeline
- 2Lead score + temperature — auto-calculated (hot / warm / cold) from engagement
- 3Activity timeline — every status change, note, email you send, and the parent's reply auto-logs here
- 4Tasks — set yourself follow-ups (call back Monday, send tour confirmation)
Convert a lead to a family
When the lead says yes:
- Open the lead.
- Click Convert to family in the top right.
- Confirm — we create the family record, copy over the parent name/email, and link the lead.
After conversion:
- The lead's status becomes Enrolled (locked — you can't change it back).
- A new family record exists with the parent pre-populated.
- Now go to the family and add the child(ren) and invite the other parent as usual.
See Add your first children for that part of the flow.
Email a lead and see their reply
Open the lead and click Send email. Pick one of your email templates as a starting point (the one matching the lead's stage is listed first) or start from scratch, edit the subject and message, and send. The email goes out under your daycare's name, and the send is logged on the lead's timeline.
When the parent replies, the reply lands on the same timeline as Reply from …, the lead's assignee and the person who sent the email are told (bell and push, plus a copy in their own inbox), and you can click Open conversation to read the whole exchange and answer right there. Answer from NestliCare rather than from the emailed copy so the reply is kept with the lead.
Automated emails from your lead automations work the same way: the send is logged, and a parent's reply lands on the timeline. Since no one person wrote them, the reply alert goes to the lead's assignee, or to your admins if the lead is unassigned.
Email sending is switched on per daycare. If the composer says it isn't switched on for your account yet, you can still write the message and copy it into your own email; email [email protected] to have sending turned on.
Assigning leads to staff
If multiple admins chase leads:
- On the lead detail page, pick a staff member under Assigned to.
- That person sees the lead at the top of their Leads view.
- Hand-offs are logged.
Tasks and follow-ups
- On the lead, click New task.
- Set a due date and short description.
- Tasks show up on Dashboard → My tasks and send a reminder email the day they're due.
Custom fields
Use customFields (free-form JSON on each lead) to capture what your specific process needs:
- Referral source details ("referred by Sarah M.")
- Tuition preferences ("wants half-day")
- Notes from the tour
Set them up under Settings → Lead configuration — each custom field shows as an input on the lead form.
Troubleshooting
"Convert to family" failed with "email already exists." That email belongs to another parent already in the system. Either they're a returning family (find them, add the new child) or the lead submitted with a shared email — ask for a distinct email before converting.
Lead is stuck in "Pending" but I did call them. Status changes aren't automatic — you need to move them manually to Interested or Declined after contact. Tedious but deliberate: pipelines only work if someone's driving.
Lead score says "cold" but the parent is engaged. The score's based on logged activity. If you chatted on the phone but didn't log a note, the system has no idea. Log a note (even "called, good conversation") and the score updates.
Email inquiry never created a lead. Check your inquiry form's configuration under Settings → Lead configuration → Public inquiry form — it needs a destination center set.